Using an LCD with an Arduino can significantly enhance your electronics endeavors, providing you with a versatile medium for output in your arduino lcd display project. Whether you aim to share data readouts, user interfaces, or customized graphics, this guide will walk you through the process of connecting an LCD to an Arduino microcontroller and writing the arduino lcd display code necessary to bring your displays to life.
Introduction to Interfacing LCD with Arduino
Understanding the Basics of LCD
Liquid Crystal Displays (LCDs) are a prevalent choice for displaying information in a vast array of electronic projects. These devices operate by manipulating the alignment of liquid crystals with an electric current, blocking or allowing backlight to pass through—it’s this dynamic that creates your visible characters and images. Such displays are not only efficient in power consumption but can also be easily interfaced with an Arduino, particularly when utilizing the widely-supported liquid crystal i2c library, which streamlines communication between the devices using a simpler wiring setup.
The Importance of Using an LCD with Arduino
Incorporating an LCD into your Arduino project unlocks a new dimension of interaction and data communication. By integrating a screen, your project can communicate vital statistics, guide user inputs or even function as the hub of a mini gaming console. As central components in your arduino lcd display project, these displays can provide significant value, making your work more intuitive and accessible for users and onlookers alike.
Essential Components and Tools
List of Required Materials
- An Arduino board (Uno, Mega, Nano, etc.)
- A 16×2 character LCD module (or similar)
- Potentiometer (for contrast adjustment)
- Breadboard and jumper wires
- Resistors (as needed for the LCD backlight)
- Connection wires (male-to-female or male-to-male, depending on your LCD’s needs)
- The liquid crystal i2c library installed through the Arduino IDE
Setting Up Your Arduino IDE
Implementing an arduino lcd display code requires the Arduino Integrated Development Environment (IDE). If you’re yet to set this up, it’s available for download from the official Arduino website. Once you’ve got the IDE installed, you’ll need to configure your board and port under the ‘Tools’ menu and ensure you have the required libraries installed, such as the liquid crystal i2c library, if you’re using an I2C connection.
Wiring Your LCD to Arduino Correctly
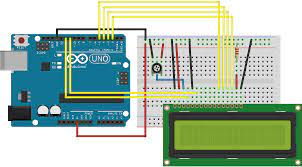
The Schematic for LCD Connection
A precise schematic is your roadmap when connecting an LCD to an Arduino, especially for the uninitiated. It specifies which pins on the LCD match up with the Arduino pins and is crucial for avoiding misconnections that could prevent the display from functioning or cause damage to either component.
Step-by-Step Wiring Instructions
Carefully wiring your LCD to the Arduino will pay off when you first power up your arduino lcd display project and see the screen come to life. Begin by making the power connections, and then proceed with the data lines using either parallel or serial wiring:
- Connect the ground (GND) pin of the LCD to the ground pin of the Arduino.
- Link the VCC pin of the LCD to the 5V output on the Arduino.
- Join the VO pin to a potentiometer for adjusting the LCD contrast.
- Connect the RS (register select) pin to a digital pin on the Arduino (pin 7, let’s say).
- The RW (read/write) pin usually goes to ground if you are only writing to the display.
- Attach the Enable pin to another digital pin on the Arduino (like pin 8).
| Arduino Pin | LCD Pin |
|---|---|
| GND | GND |
| 5V | VCC |
| Potentiometer (middle pin) | VO |
| Pin 7 | RS |
| GND | RW |
| Pin 8 | E |
Please note that we haven’t addressed the LCD’s data pins (D0-D7), as their connections depend on the mode (4-bit or 8-bit) you choose to operate in and the corresponding digital pins on the Arduino.
Programming the Arduino to Display Information
An Overview of the LCD Library
Once the physical connection between the Arduino and the LCD is set up, the next pivotal step is to program the Arduino to communicate with the display. The Arduino environment provides a rich set of libraries to manage LCDs, with the LiquidCrystal library being the most commonly used for parallel connections. This library allows you to interface with different sizes of LCDs and provides convenient functions such as print() and setCursor().
Writing Your First Arduino LCD Display Code
Crafting your initial arduino lcd display code is an exciting milestone. Here’s how to write a simple program that will display “Hello, World!” on the LCD.
- Start by including the LiquidCrystal library at the beginning of your code with
#include <LiquidCrystal.h>. - Define the pin numbers that connect to the RS, EN, D4, D5, D6, and D7 pins of the LCD. Then create a LiquidCrystal object with these pins as arguments.
- In the
setup()function, initialize the display with thebegin()method, specifying the dimensions of the display (typically columns and rows). - Use the
print()function in theloop()to send text to the LCD. Set the cursor position withsetCursor()if necessary, before printing the text.
The process consists of initializing the LCD and then sending the text data you want to display. With the simple commands provided by the LiquidCrystal library, you can easily begin to customize and expand upon this functionality to include dynamic texts based on sensor inputs or user interactions.
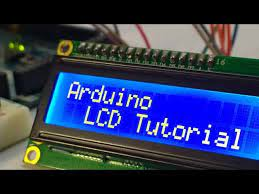
Uploading the Code to Arduino
After writing the code, make sure your Arduino is connected to your computer. Select the correct board and port in the Arduino IDE, then click the upload button (right arrow). The IDE compiles the code and uploads it to the Arduino. If the upload is successful, the text “Hello, World!” should appear on the LCD.
Debugging Common Issues
If the text does not appear, or it looks odd, double-check your wiring. Another common issue is incorrect contrast settings on the potentiometer, which can make the display seem blank or hard to read. Adjusting the potentiometer should reveal the text if the contrast was initially too high or too low.
Expanding Your Learning: Advanced Display Techniques
Custom Characters and Graphics
The standard alphanumeric output is just the beginning. You can also create custom characters and graphics to display on your LCDs. The LiquidCrystal library allows you to create byte arrays that define custom characters, and you can then print these using the same print() function. Here’s a simple approach:
- Define a byte array with the bitmap of your custom character (up to eight custom characters on most screens).
- Use the
createChar()function to load the character into the LCD’s memory, giving it a reference number. - When you want to display your custom character, just call
print()with the reference number you previously assigned.
Creating Interactive Displays with Sensors
Arduino is well-known for its capability to interface with a variety of sensors. You can take inputs from these sensors and display them in real-time on your LCD. For instance, you could create a digital thermometer, a humidity display, or a simple counter that reacts to a sensor’s signal. This approach provides a richer interaction and brings a static project to life.
Conclusion: Mastering LCD Displays with Arduino
Interfacing an LCD with Arduino paves the way for robust user interfaces in your projects. By mastering the initial setup, wiring, and programming techniques, you lay the foundation for countless creative applications. As technology continues to evolve, so do the capabilities and complexities of LCD projects, offering ever-greater opportunities for inventiveness and functional design. Whether for hobbyists, educators, or developers, the Arduino and LCD combination remains a versatile and fulfilling aspect of electronics exploration.
Frequently Asked Questions (FAQs)
- Can I use an Arduino LCD module that supports I2C? Yes, I2C LCD modules are fantastic for simplifying wiring and reducing pin usage on the Arduino. Ensure you have the appropriate liquid crystal i2c library installed and reference its documentation for proper setup and functions.
- What are some common problems when interfacing an LCD with Arduino? Common issues include improper wiring, incorrect contrast settings, using the wrong pin numbers in the arduino lcd display code, and potential issues with the library installation. Always double-check these areas if you encounter problems.
- How many characters can a standard 16×2 LCD display? A standard 16×2 LCD can display up to 32 characters, with 16 characters per line in 2 lines.
- Is it possible to display animations on an LCD using an Arduino? While LCDs are not designed for high-frame-rate animations, you can create simple animations by rapidly changing custom characters or by shifting text across the display.
- Can the brightness of the LCD backlight be controlled using the Arduino? Yes, by connecting the backlight to a PWM-capable pin on the Arduino, you can use the
analogWrite()function to adjust the brightness of the backlight.